Page Contents
- How To Make Solar Panels
- Steps to manufacture solar panels
- Step 1: Making frames to hold your solar panels
- Step 2: Purchase Solar cells
- Step 3: The solar cells should be stabbed
- Step 4: Test the cells of solar power
- Step 5: Setting up the solar panel’s front and back sides
- Step 6: Assembling solar cells
- Step 7: Check the strings of solar cells
- Step 8: Connect the strings to the acrylic backing
- Step 9: Connecting the strings of the solar panel
- Step 10: Installation of the junction box
- Step 11: Put together the solar panel
- How To Build A Battery Bank For Solar
- FAQ:
- Related Solar News
- Steps to manufacture solar panels

How To Make Solar Panels
Solar panels that are commercially available cost a lot. However, you can create the solar panels you want by starting from scratch. To construct the solar panels of your choice you’ll have to construct a frame, purchase the solar panels, connect them. create an enclosure for the panels, then wire the panel and finally mount your solar panel in its entirety.
Solar power is a booming business. By using this renewable source of solar energy electricity can be produced that is not harmful to the environment or decreases the carbon footprint. It also aids in reducing the cost of electricity.
One of the benefits of creating the solar panels yourself is they’re cheaper and you can design the solar panel to your needs for power. Here are the steps you need to follow to build an at-home solar panel.
Steps to manufacture solar panels
One of the benefits of creating the solar panels yourself is they’re cheaper and you can design the solar panel to your needs for power. Here are the steps you need to follow to build an at-home solar panel.
Step 1: Making frames to hold your solar panels
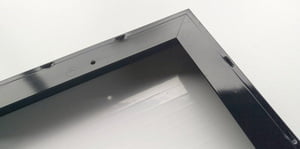
It is the first thing to do. design an enclosure that will house the solar panel.
This frame is designed to protect the internal elements of the solar system from mechanical and thermal tensions. Solar cells are extremely delicate and require protection by frames. Frames also provide mount attachments.
The frame must not have sharp edges, and it must be mechanically and electrically conductory and earthed all over. It could be constructed from glass, wood, or plywood, as well as plastic.
Step 2: Purchase Solar cells
Solar cells are composed of semiconductor material i.e. silicon. These cells absorb sunlight’s energy and convert it to direct current (DC) that is later transformed into AC through an inverter. The AC is utilized to power homes.
There are many producers of solar cells, and the most reliable solar cells are produced from China, the United States, China, or Japan. Chinese sellers offer lower solar cells, however, there is no guarantee. American producers offer higher quality and expensive solar cells.
The number of cells you purchase will depend on the energy you intend to produce with the solar panels. Below are a few things to keep in mind when purchasing solar cells.
- Solar cells are very fragile, so make sure you purchase extras.
- The solar cells have wax for protection. The wax can be removed from the cells by submerging them in hot, but not boiling water.
- Solar cells are easily available on the internet through retailers like eBay or you could make them yourself by starting from scratch.
- Each cell shouldn’t be less than $1-2 per watt.
- Cells for solar power were made in various dimensions with the standard solar cell measuring 6 inches in width. It can produce 1.75 watts per. If you’re looking to increase the energy, get larger solar cells.
- Monocrystalline solar cells can be costly. The most efficient cost-to-efficiency alternative is to use polycrystalline solar cells.

Step 3: The solar cells should be stabbed
Tabbing solar cells is the procedure that connects the individual solar cells to form an entire photovoltaic module.
There is a possibility of purchasing solar cells that are pre-tabbed, but they’re more expensive. Tabbing a solar cell is an important process, and precautions should be taken before tabbing solar cells. A few precautionary measures are listed below:
- Wear gloves when working with solar cells.
- Solar cells must be handled with extreme care since they’re extremely fragile.
- When soldering, put on masks or safety goggles to shield your eyes from flicking solder as well as fumes.
How to Tabbing at the solar cell
Solar cell tabbing is accomplished by soldering an electrical wire into the contact points of solar cells. The steps for the process of tabbing solar cells are as follows:
- Put your solar cell on an uncluttered surface with the negative side facing upwards.
- The flex pen rubs over the lines that run both up and down on the solar cells. These lines are known as contact strips.
- Cut the pieces of tabbing wire taking into consideration the size of every piece must be at least twice the diameter that the solar cells are. In the case of a solar array that is 2 inches tall the cut pieces of wire must be 2 times 2 = 4 inches long.
- Pick up the wire that is tabbing and put it onto the strips of contact. Tabbing wire is coated in solder already. Warm the soldering iron and connect the tabbing cable into the solar cells.
If you do not want to go through the whole process, you could purchase pre-tabbed solar cells and bypass this step.

Step 4: Test the cells of solar power
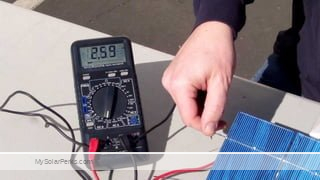
The testing of solar cells is an essential task since a malfunctioning solar cell could affect the efficiency of the entire solar panel. The solar cell must be tested for the voltage and the current.
Voltage Testing
- The solar cell should be placed in the light.
- Connect the black wire of the multimeter into the black port and its red wire into the port for voltage to test the voltage.
- Put the solar panel on a smooth surface with the positive side facing upwards.
- The black lead of the multimeter should be connected towards the panel’s negative side while the other lead is to the solar panel’s positive contact.
- Check the voltage reading displayed on your multimeter. The voltage for a typical 1.75-watt solar panel should equal approximately 0.5 voltage. If the voltage is lower than 0.5 Volts, the solar cell is likely to be damaged.
Current Testing
- The solar cell should be placed in the light.
- Plug the black wire in the port of your multimeter. Plug the connect the red one to the port Amps port. This will determine the current value.
- Turn on multi-meter. Adjust the dial on the multi-meter to the amps setting.
- Set the solar cell on a clean surface, with its positive side facing upwards.
- The black lead of the multimeter should be connected to the solar panel’s negative contacts while the other lead is to the solar panel’s positive contact.
- Take note of the current value of the multimeter. This is the current reading of a standard 1.75-watt solar cell must be approximately 3.5 amps. If the current value is lower than 3.5 amps, the solar cell is likely to be damaged.
Step 5: Setting up the solar panel’s front and back sides
After testing the solar cells following is the process to create both the back and front sides that the panel. The front part of the panels will consist of a clear piece of acrylic. The back will be covered in white acrylic sheets. Solar cells are set between the two sheets. Sheets made of acrylic are highly preferred since they are weatherproof, durable, and resistant to corrosion.
The dimensions of the two sheets should be equal to the dimension of the panel. When calculating the dimensions, you should take into account that the cells don’t connect and that there are approximately 0.25 inches of distance between the solar cells. Also, be sure to leave about 1 to 2 inches of extra space at the edge of your solar panel to leave enough space for the frame as well as other wires. Cut the two sheets of acrylic after completing the dimension calculations.

Step 6: Assembling solar cells
In this stage, you will need to plan the physical arrangement that solar cells will be placed on the frame. Then, begin linking the solar panels with each other. Solar cells need to connect in series to obtain maximum voltage.


For instance, when there are 36 solar cells (63 watts) The layout might comprise four strings (columns composed of solar cells) each with nine solar cells that are connected in series. Let’s look into the specifics about how solar cells can be joined to each other in series.
- The bottom of the solar cell’s the positive side while the top is the opposite side.
- Set both solar cells onto a smooth surface, with the positive sides facing upwards
- Make use of the soldering iron to join these two solar cells using the Tabbing wire.
- Similar to soldering batteries, the positive side of the initial solar cell is linked to both sides of the second solar cell.
Follow the steps above for connecting the remainder of solar cells. Join the cells in such a way as until you reach an appropriate voltage, which is 12 Volts to 24 Volts. This voltage is needed to activate a 12 or 24 Volt Inverter. The inverter converts 12/24 Volts of DC into 110/220 Volts AC power.

Step 7: Check the strings of solar cells
Once you’ve connected your solar cell examine the strings to confirm they’re working correctly and delivering the correct Volts and amps. Put the strings of solar cells under the sunlight and use a multimeter to measure the current and voltage emanating from each solar cell on each string.

Step 8: Connect the strings to the acrylic backing
The solar cell’s strings are connected to acrylic sheets (backing) made in step 5. Here are the steps when attaching the strings on the backing.
- Lay the sheet of white acrylic on the unclean area.
- Put the stringers on the surface with the positive side facing toward the sky.
- Apply some silicon on the positive side of every solar cell in every string.
- Set all strings in different positions (positive to negative, and then positive, and the cycle continues) on the backing of the acrylic. This alternative method of connecting strings is known as series wiring. It can help increase the overall voltage that the panel receives.

Step 9: Connecting the strings of the solar panel
After you have secured the solar cell’s strings with backing, the following step is to connect the strings. To do this, bus wire (a large wire) is utilized. Make use of the soldering iron, flux, and solder to join the strings.

Step 10: Installation of the junction box
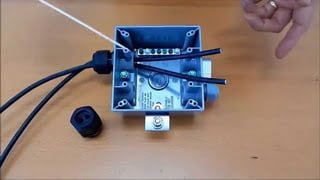
In this phase, we’ll install the junction box on the rear of the solar panel.
- Make a hole that is the dimensions that the chase nipple will pass through in front of your panel and the junction box. The chase nipple should pass through this hole at the rear of the panel to the junction box.
- Utilizing silicon, the line can attach the junction box to one end of the solar panel. Press gently on the junction box, and wait for silicon to completely dry.
- Connect two terminals in the junction box with assistance from silicon.
- Place the chase nipple in the junction box through the hole that was drilled earlier.
- Connect the two wires of low gauge through the chase the nipple.
- Connect the low-gauge black wire bus wire’s contact point, and the Red gauge wire connects to the positive bus contact point on the solar panel.
- Repeat the step above to the opposite part of the panel.
- The red wire should be connected to any of the connectors (4 connections total) on the terminal strip, and connect the black wire to the other connection in the terminal strip. For connecting these wires to one of the terminal strips, just unwind the screw and run your wire over it, and then tighten it.
- Similar to, two additional wires will be connected to the bottom of the strip of terminals.
- The other wire will be connected to the inverter, which converts DC power to AC power.
Step 11: Put together the solar panel
The last step is to assemble the entire system. Put the clear acrylic sheet that was cut before putting it on the uppermost part of your solar panel. Place the entire panel in the frame you created in step 1. It is now ready and you can test its performance afterward to confirm that it’s functioning effectively.

How To Build A Battery Bank For Solar
You can create your bank of batteries to complement the solar panels you have. Below are the steps to follow to build the battery bank of your choice.
Calculate your load
The load is the amount of power you normally use daily. It is easy to figure this out by looking through your electric bills for the past 12 months. Divide that number by 365 to determine the value of your daily usage.
Find the power capacity required
After calculating the load then you need to figure out the amount of backup power you will require. In general, most people require an emergency backup of 2 to 4 days.
Connect batteries
There are two ways to connect several batteries. Each has its distinct pros and cons.
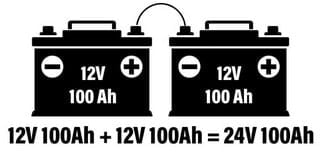
Batteries are connected in series by connecting their positive terminals of one to the negative ends of another. This arrangement produces an increase in voltage.
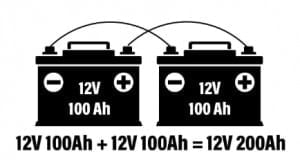
Battery connections are made in parallel, by joining the positive terminal of one to its positive terminal from the following (and each terminal that is negative connects to the following positive terminal). This arrangement boosts the power of the bank through increasing amp-hours.
The size of the inverter
The inverter is a crucial component of the solar panel. It converts AC output from the solar panel and the energy stored in batteries to usable AC. The inverter doesn’t contain storage capacity, but it must be large enough for the full workload that is placed on it when it converts the energy.
The size of the inverter needs to be similar to the size of the solar system roughly. For example, a five KW(kilowatt) solar panel needs to include a 5000-watt inverter that is working optimally.
Pros and cons of building your own solar system
FAQ:
Solar cells
Solar Bus wire
Solar tabbing wire
Flux Pen
Soldering iron
Silicon sealant
Gauge wire
Glass or wood, or aluminum
Drills and screw
Acrylic sheets
Multi-meter
Wire Cutter
DIY solar panel installation is more affordable however, your choices are restricted. According to EnergySage Solar Marketplace, the average total cost of getting solar power for homes (meaning the cost before rebates and incentives are taken into consideration) is $16,860.
If the solar panel is installed your home will generate its own, clean, emission-free electric power. If you’re a DIY enthusiast you can construct the solar system of your choice. Building your own solar system to harness solar energy is a big undertaking. In certain cases, you could even construct yourself solar panels but the extent to which you can make with your own home solar will depend on how much you’re looking to use it for.
It can be easy to build a solar panel but to be functioning for a lengthy duration, they must be constructed with the highest level of accuracy.
The solar panels, as well as the systems, can save you money and will yield a profit from your investment in a short time. The rising value of your property, the reduction in the cost of utilities along the Federal tax credit reduce the initial costs for installing your own solar panel system.
Based on a report of Energy Sage Solar Marketplace, the design and installation of the solar panel will cost around 10 percent of the total cost. If you can install solar panels, there is a good chance that a significant amount of money could be saved. A handyman who has professional experience can create and set up solar panels, but it is highly recommended to employ an expert certified to install them.
The solar panel lasts for about 25-30 years, therefore it is essential to consider the initial price and advantages. If you purchase the material and put it up yourself is going to cost less but the quality may be affected. The online material is not as good when compared to professional solar panels, which are backed by 20-25 years of guarantee.
“Off-grid living” means the disconnection from grid electricity and generating your electricity using different sources such as wind power, solar power, etc. A lot of people are looking to live a greener lifestyle and an environmentally sustainable one.
Off-grid living reduces the use of fossil fuels, reduces carbon footprint, and contributes to an environmentally sustainable and clean environment. Unfortunately, it is unlawful to completely disconnect from the utility system that is owned by the public.
Certain countries permit ” grid-tied” solar power system. In a grid-tied power system, the power generated by the solar panels is utilized to power the appliances in your home. If the power generated isn’t sufficient, you can utilize grid power with it. It will result in a lower cost of electricity.
If there is excess power generated through the solar panels it is returned to the grid, in exchange for energy credits as it is part of the net-metering program.
The energy credits can be used during the rainy season and in the evenings. Certain utility companies will also compensate the customer for excess power.


